
In this video, I'll show you what your remote pitching training program looks like in the Bridge app. If you have any questions, write them in the comments! You can find the programs here.
You can find more details about the programs here.
In this video, I'll show you what your remote pitching training program looks like in the Bridge app. If you have any questions, write them in the comments! You can find the programs here.
You can find more details about the programs here.

A particularly strong driving motivation for me as a coach is to offer the players the baseball environment that I have always wanted. Together with Markus Solbach and Markus Winkler, I have finally been able to implement one of these things - an all-encompassing offseason pitching program.
Not only do we have concentrated know-how from many years as players and coaches - it is even delivered directly to your cell phone! There is no easier way to implement a program when the coach is not on site.
For each day, you will receive your throwing program and strength/conditioning program, with all the details that leave (virtually) no questions unanswered, directly on your cell phone. The only question is - are you going to do it or not?
The Offseason Pitching Program is available in two versions - a 12-week version that mainly prepares you for the season, and an 18-week version that also includes a development block.
On Ramp- Getting the arm fit, learning drills and making initial adjustments - both mechanically and physiologically. The increase in workload was derived from the findings of numerous studies in the field of general and throwing-specific workload management. We have even created our own model that can (approximately) represent different scenarios with the associated risk of injury - but that's a topic for another blog post.
Mound Blend - Getting used to the mound and transferring what you have learned to the mound
Blend to Season - The final touches before the season
Required training equipment
Necessary:
Recommended:
On Ramp- Get the arm fit, learn drills and make initial adjustments - both mechanically and physiologically.
Mound Blend - Getting used to the mound and transferring what you have learned to the mound
Command - Work on your command and document your progress (alternatively, you could dedicate the command bullpens to improving your pitch arsenal, for example)
Blend to Season - The final touches before the season
Required training equipment
Necessary:
Recommended:
Each training day includes a section of pitching drills. These are largely based on the methods of backwards chaining and chunking (dividing the movement into individual parts, starting at the end of the movement) and differential learning (creating deviations that lead to small inefficiencies in order to challenge you to find the optimal solution). We often create the deviations (variability) using different heavy and large balls(plyocare balls), which lead to different speeds and increased or decreased perception of the movement (proprioceptive feedback). The training equipment is used in more or less restricted forms of movement (to improve various areas of the throw in a reinforced and isolated manner or to bring all parts together and make them interact).
You can opt for the following versions to make the whole thing even more suitable for you:
If you want the program to be even more tailored to you, we can determine your starting point via a (remote) assessment and then adapt the drills, phases and focus points exactly to you (initially only the pitching part). But if you want this, you should hurry - the offseason should start in mid-November, and there are only limited spots!

Photo: Thomas Schönenborn | The third part of the series dealt with the rotation phase, which is partly responsible for a good lead leg block. This is the subject of the fourth and final part of the series.
The main task of the lead leg block is to stabilize the knee, transfer the reaction forces from the ground upwards and create a good rotational base for the hips. Again, absolute force is not as important as efficiently used force, especially along the x-axis (the axis from rubber to home plate).
If the stride is longer and the knee is behind the front foot, it is easier to develop forces along the x-axis than if the foot is directly under the knee and closer to the hip. In addition, a longer stride (with the correct "stacked" position, in which the upper body is shot up to footplant and the head is above the navel) puts the hips in a better position to rotate and tilt optimally.

In contrast to the forces transmitted via the rear leg, the forces transmitted via the front leg correlate significantly with the throwing speed(https://www.drivelinebaseball.com/2015/12/efficient-front-leg-mechanics-that-lead-to-high-velocity/).
You can recognize a good lead leg block by the fact that the knee does not bend further from foot contact, but stretches. The knee is already stable to the left and right at footplant. The angle does not have to change significantly (often hardly recognizable with the naked eye), but quickly. The faster the knee stabilizes, the more efficiently forces can be transferred. Some pitchers perform a clearly visible extension of the knee (even before footplant), while others primarily prevent further bending of the leg and an extension is barely noticeable. Both are possible. The decisive factors are the speed of extension and the timing.

If the hip is still closed when the foot makes contact, the lead-leg block can only take place after a delay and forces are not optimally transferred.
Experience has shown that junior players often find the lead leg block particularly difficult until they have sufficient strength and coordination.
Exercises that can improve the lead leg block are roll-ins, rocker-throws and walking wind-ups with the focus on keeping the hips behind the knee for as long as possible.

Photo: Thomas Schönenborn|
The second part of the series was about the stride. Part two deals with hip rotation.
The rotation phase overlaps with the stride phase and the blocking phase. Its main component is hip rotation.
Interestingly, maximum hip rotation speed is not related to ball speed - at least for more advanced pitchers. However, the timing of the maximum rotation speed is much more important. It should be reached after the footplant but as long as possible before the highest rotation speed of the upper body.
The highest rotation speed can hardly be seen with the naked eye, even on high-speed videos. A good indication that the timing is good is if the hip remains closed for a long time, opens shortly before footplant, and is open at approx. 45 degrees at footplant. If the hip opens much earlier (an indication of inefficient hip-shoulder separation), or if it is still closed at footplant (making it difficult to perform an optimal lead-leg block), the timing can usually still be improved.


Durch diese Verzögerung kann die Hip-Shoulder Seperation unterstützt werden. In einer hausinternen Studie von Driveline, öffnen Pitcher, die härter werfen (>88mph), die Hüfte früher als Pitcher, die weniger hart werfen (<76mph)(https://www.drivelinebaseball.com/2019/09/full-signal-analyses-the-next-step-in-biomechanical-analysis/).
In order for the lead leg block to work well, the hips should be open approx. 45 degrees and tilted forwards in footplant. The tilt initiates the flexion of the upper body.
Good exercises to improve hip rotation and timing are roll-ins and drop-step-throws.
The fourth and final part deals with the blocking phase and the lead leg block.

Photo: Thomas Schönenborn|
The first part of the series dealt with the leg lift and the hip load. Part two deals with the stride.
The striding phase overlaps with the loading and rotation phase.
It is characterized by
Sufficient rope length ensures a good angle for power transmission during the lead leg block and creates time for hip rotation and for the arm. You should always aim for a long rope length.
The length of the stride depends primarily on the flexion of the back leg and how well the player can move. This is why it is often not helpful to coach them using cues with an internal focus, such as "do a longer stride". This can quickly lead to negative effects in the sequencing. A short stride with good timing is better than a long stride with bad timing.
A better approach is to improve the pitcher's athleticism (especially mobility, coordination of lunges in all variations and stride jumps) and then improve the specific movement patterns via regression exercises such as roll-ins, step-backs and walking windups. Also, an improved lead leg block can allow an athlete to do a bigger stride.
The same applies to the stride speed. This correlates with higher ball speed, but can disrupt the timing of the sequencing if it is too fast for the player. It can also be improved through better athleticism and throwing regression.
The stride direction depends very much on the previous components of the delivery, with hip flexion in particular playing a major role. In addition, if the rear foot has too little contact with the ground and anatomical restrictions can influence the direction of the stride.
It often helps to instruct the athlete to move their head along a line to home plate instead of telling them where their foot should land. If this doesn't work either, it may be due to strength, mobility or other limitations that need to be addressed.
Good exercises that improve your stride are roll-ins and walking wind-ups.
Part 3 continues with the rotation phase and the role of the hips.

Photo: Thomas Schönenborn|
Use your legs!" - What pitcher has never heard that, what coach has never said that? I heard it a lot as a player. I just never understood exactly what it meant. I assume I'm not the only one who feels that way...
Many years later, not so long ago, I started to learn more about it and better understand what exactly it all means. In this four-part series, I would like to explain this in more detail.
Roughly summarized, the Stride
These tasks are completed in four phases, some of which overlap.
The first phase is the loading phase.
It starts with the leg lift. The leg lift can be designed in many ways, which can affect other parts of the delivery. If these work optimally, there is no need to change the leg lift.
In the most general form of the leg lift, the knee is lifted upwards and slightly towards second base. The body's center of gravity is slightly in front of the rubber to support the acceleration of the stride phase. However, too much of this "lean" can lead to timing problems. If the center of gravity remains directly above the rubber or even behind the rubber, timing problems can also arise. Above all, however, it becomes very difficult to build up the necessary speed.

In the loading phase, the hips must also be loaded through counter-rotation and flexion. The counter-rotation happens on the way to the highest point of the leg lift.
The hip flexion starts on the way down and forwards. It supports the posture of the upper body, the overall alignment and the hip extension in the rotation phase. Correct hip flexion is supported by good and even ground contact with the entire rear foot. It is therefore important to keep the standing surface in front of the rubber firm and flat.
Step-back-throws are a very simple exercise to improve the load and transfer of the center of gravity.
Part 2 of the series continues with the Stride.
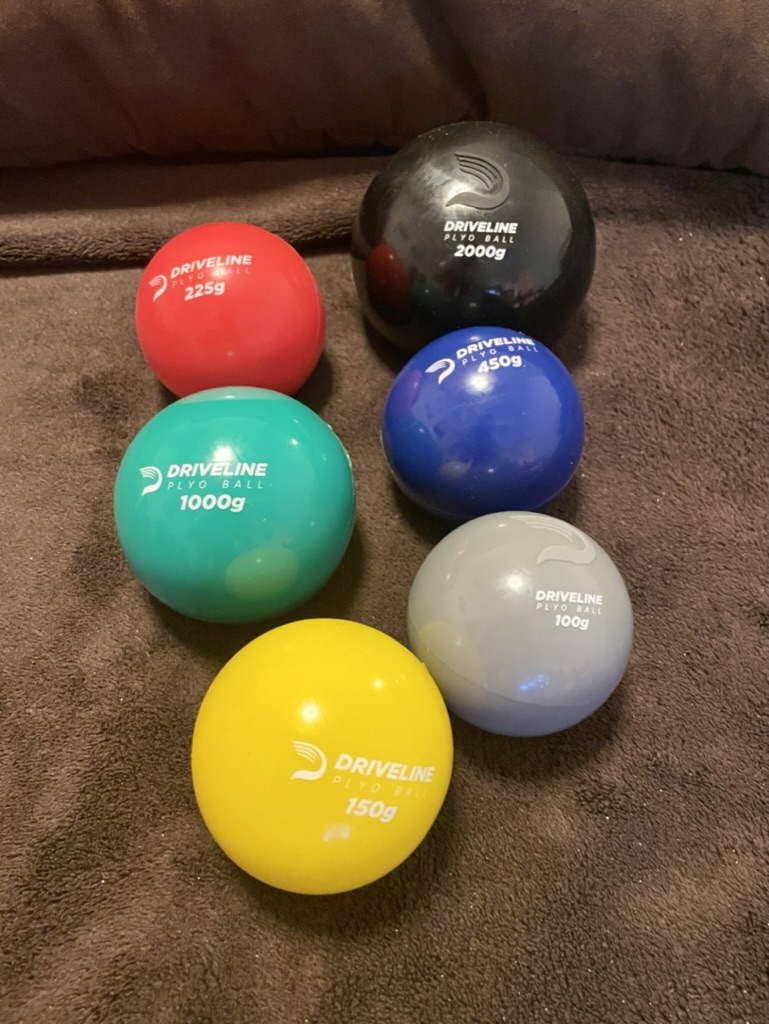
You see them everywhere on baseball fields and at tournaments: Colorful, soft balls that are thrown against walls and nets. These balls are called plyo (or plyocare) balls and it's hard to imagine modern baseball without them. They can be used in many different ways, which can make it difficult to categorize and use them correctly at first.

There's also the old, widespread stigma that all balls heavier than 5 ounces (the weight of a baseball) are the devil for your throwing arm - I was taught this emphatically.
Digression: Without going beyond the scope of this article, I would like to briefly address the question: "Are heavy balls bad/dangerous?". They are no more or less dangerous than a baseball. Just as you can overload your body with a baseball, you can of course overload your body with weighted balls/plyocare balls (just as you can with sprints, bench presses, skiing, jogging, crocheting, etc...) As unromantic as it may sound, the human body was not designed for a 5 ounce ball any more than the 5 ounce ball was designed for the body. It just evolved that way.
Heavier balls also do NOT automatically lead to a higher load on the arm (which is desirable in some situations - compare all other forms of training that are intended to induce physical adaptations). Roughly speaking, the stress caused varies depending on the weight, exercise and, above all, intensity(https://infogram.com/plyo-velo-to-mound-comparison-1h0r6rvkkkz72ek,https://www.drivelinebaseball.com/2017/12/plyo-velocity-weighted-balls-replication/ ).
Plyoballs are a great training tool to make the warm-up more effective and efficient. The slightly increased weight of the ball allows the arm to enter into stronger external rotation (layback) even at lower intensities and to mobilize, stabilize and activate the arm in these ranges of motion. At the same time, the exercises and the balls contribute to an improved perception of movement, making higher intensities possible more quickly.
Although it is not the main aim of the Plyocare Balls, targeted training with maximum intensity can induce physical adaptations and train sport-specific speed strength.
Paired with the "constraint drills", i.e. exercises with certain restrictions on the degrees of freedom, the plyoballs can be used to improve throwing technique very effectively. The different weights of the balls create an increased perception of movement. This allows the body to find its own ideal technique within the limits set by the exercises. Good movement patterns are therefore memorized and consolidated.
The improved arm fitness and more efficient throwing technique alone protect the arm from injury as a first step. The next step is to use the Plyocare Balls to train shock absorption and arm deceleration. Example arm care routines can be found here, here and here.
If you would like to learn more about the use of Driveline Plyocare Balls, read Plyocare Balls exercises and how to incorporate them into your training.

Do you find the concept of training with Plyocare Balls interesting and perhaps have already purchased a Driveline Plyocare Ball Set, but don't quite know what to do with it?

No problem, I'll try to explain it to you as simply as possible so that you can get started quickly and make progress! If you want to know more about Plyocare Balls in general, read Plyocare Balls and how they work.
The exercises are structured in such a way that they
1. start at the end of the delivery and
2. allow more and more degrees of freedom from exercise to exercise.
As a first step, you can perform a general series of drills. Later, when you are more experienced, you can also customize the exercise selection.
Here is a brief introduction to the general series:
Youth: 10x green ball
Adult (ca 14): 10x green ball, 10x black ball
Reverse throws strengthen the posterior muscle chain of the upper body. When the ball is released, the hips are parallel to the wall and the shoulder girdle is normal to the wall. This prepares the body for the "Hip to Shoulder Separation".
Youth: 10x green ball
Adults (approx. from 14): 10x green ball, 10x black ball
One of the most complex but also most important Plyocare Ball exercises. This exercise focuses very strongly on arm action and the correct timing of upper body rotation, shoulder rotation, arm extension and forearm pronation. The most important points are:
Youth: 10x blue ball
Adults (approx. from 14): 10x green ball, 10x blue ball
With rollins, a linear component is added to the arm action. The step sequence is the same as for normal throwing. The big difference is that the back foot does not turn, but points continuously towards the target. This means that the hips are always open and you can increasingly feel how the armaction can help to keep the upper body closed against the open hips.
1x blue ball, 1x red ball, 1x yellow ball, 1x gray ball
(1-2 sentences)
The Foot up Rockers allow one step more degrees of freedom. In the starting position, the legs are in the same position as with Footplant during a throw. To initiate the throw, the player first pushes the hips forwards and then backwards. As he shifts his weight and hips backwards, he also lifts his front foot a few centimeters off the ground before throwing the ball. In the rocker throw, the player must/can use almost the entire chain to transfer energy to the ball. The main focus in this drill is on sequencing and the lead leg block.
1x blue ball, 1x red ball, 1x yellow ball, 1x gray ball
(1-2 sentences)
The walking windups are the final step and are closest to the actual pitching delivery. The player takes a few steps into the throw. He also lifts his knee as he would for a pitch. The exercise improves the speed of the delivery and helps to learn to sequence the movement at a higher speed.
After an extensive general and arm-specific warm-up (e.g. J-Bands, Shoulder Tube, Wrist Weight drills) and before throwing is the best time for the drills in training.
The entire series can be performed up to 3 times a week (always at least one day apart) at approx. 70% intensity. After a familiarization period of 3-4 weeks, 1-2 of these units can also be performed at approx. 90%.
On the other days, the recovery version of the exercises can be performed. These are only reverse throws and pivot pickoffs with 50-60% intensity.
Arm Recovery/Care should be performed at the end of the workout. You can find example routines for this here:
Have fun and be successful!


